
5.1 Import in Maya

Frame Rate Preferences
Don’t skip this step!
Very important to set frame rate before importing
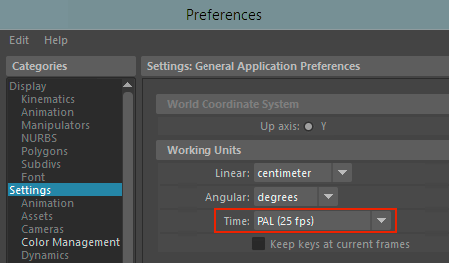
Set Frame Rate
Windows > Settings/Preferences > Settings > Time
Match frame rate to your Nuke Project Settings
Our Nuke setup is 25 fps
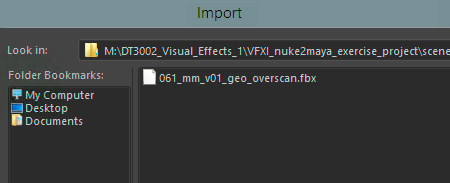
Import FBX
File > Import…
Assuming you exported FBX from Nuke with overscan and camera focal length divided

Timeline
Set start and end time according to your FBX export
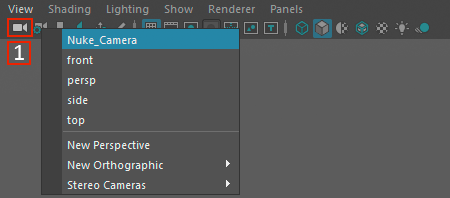
View Nuke Camera
Right-click Camera Icon > Select Nuke camera
Default name is Camera1, renamed here

Create Image Plane
1. Select camera by clicking viewport Camera Icon
2. This should open Attribute Editor, or open with top left icon Show/Hide Attribute Editor
3. Scroll down to Environment and Create Image Plane
Alternatively, above viewport camera icon
View > Image Plane > Import Images…

Import Undistort Background
We will use the undistorted overscan image sequence exported from Nuke
4. Open the image sequence
5. Tick Use Image Sequence
6. Select looking through camera
7. Scroll down and increase Depth distance
Depends on scale of your scene

Viewport
Tick Resolution Gate and Wireframe icons
Scrub through timeline and confirm image sequence and Nuke dummy objects are in sync
If not in sync, likely frame rate settings don’t match Nuke’s FBX

Overscan Render Settings
Open with Render Settings icon

Render Settings
Renderable Camera: Select Nuke camera
Image Size: Your overscan image size, here HD + 10%
Use any smaller size with the same aspect ratio (here 1.778) for test renders, i.e. default 960 x 540 or half overscan 1106 x 594