
8. Export Settings MP4
Which export settings should I use?
Depends on the content of the film
Flat look, mostly static backgrounds, little detail, and gradients: Low data rate
CG with details, and gradients: Medium data rate
VFX, live action, high detail, grain: High data rate
Fast action or editing: High data rate
Depends also on the purpose of the file. Screening version: Higher. Sharing online? Lower
Run tests to find the best settings for your film. Pick 20 second of the most challenging part in regard to level of detail, gradients and pace
Check the gradients closely for banding artifacts. They are very annoying on large cinema screens

Banding Artifact
Bring up display brightness or gamma
Gradient on left is not smooth but shows steps called banding, typical problem of compressed 8-bit
Add small noise before exporting
Increase data rate
Using Presets
ADM presets
There are ready-to-use presets available at ADM
ADM presets, from low to very high data rate, are installed in Premiere CS6 on Windows. All you have to do is switch the Format to H.264 and pick one from the top of the Preset list
Import ADM presets
For Premiere on Mac, or Premiere CC on both platforms, simply import the presets
![]() Import presets from file and navigate to Resource server (drive R) > EXPORT-SETTINGS > H264_MP4
Import presets from file and navigate to Resource server (drive R) > EXPORT-SETTINGS > H264_MP4
Adobe Presets
Adobe Media Encoder and Premiere come with installed export presets, including YouTube and Vimeo. Use them for their purpose only, not for screening versions
If you need to use one of the installed presets at home, use HD 1080p 25, which sets a data rate between ADM presets Medium and High

General Settings
Export Settings
Match Sequence Settings: Disable
Format: H.264
Preset: Premiere CS6 on Win, pick ADM preset
![]() Or import preset from server R
Or import preset from server R
Name: Meaningful name, not final.mp4
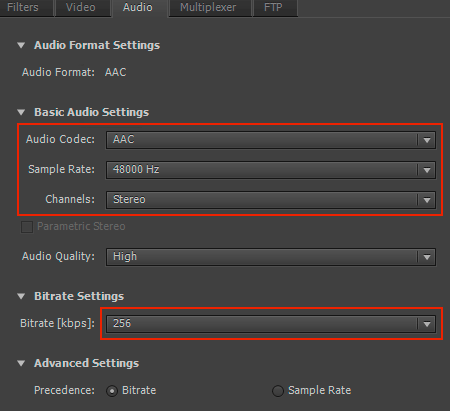
Audio Settings Details
Audio Codec: AAC
Sample Rate: 48 – According to your project
Bitrate: 256 or higher, depends on source
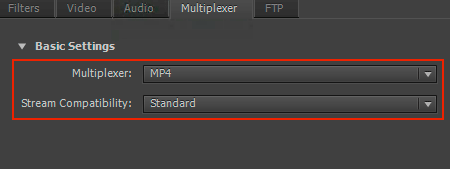
Multiplexer Settings
Multiplexer: MP4
Stream: Standard

Low Data Rate Settings
Size and Frame Rate according to your project
Field Order: Progressive
Aspect: Square
Profile and Level: Main 4.0
Bitrate Encoding: VBR, 2 pass
Target Bitrate: 10
Maximum Bitrate: 20
Check the estimated file size
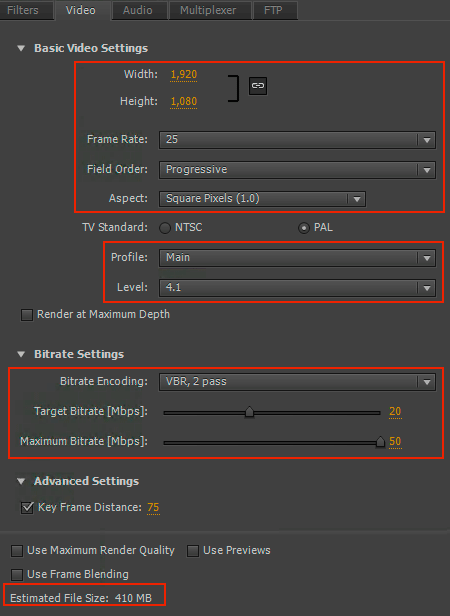
Medium Data Rate Settings
Size and Frame Rate according to your project
Field Order: Progressive
Aspect: Square
Profile and Level: Main 4.1
Bitrate Encoding: VBR, 2 pass
Target Bitrate: 20
Maximum Bitrate: 50
Check the estimated file size

High Data Rate Settings
Size and Frame Rate according to your project
Field Order: Progressive
Aspect: Square
Profile and Level: Main 5.1
Bitrate Encoding: VBR, 2 pass
Target Bitrate: 50
Maximum Bitrate: 100
Check the estimated file size

Very High Data Rate Settings
Size and Frame Rate according to your project
Field Order: Progressive
Aspect: Square
Profile and Level: Main 5.1
Bitrate Encoding: VBR, 2 pass
Target Bitrate: 100
Maximum Bitrate: 200
Check the estimated file size
Download ADM Export Presets
Download the ADM presets and import into Premiere or Adobe Media Encoder