
1.2 Integration White-Black Point
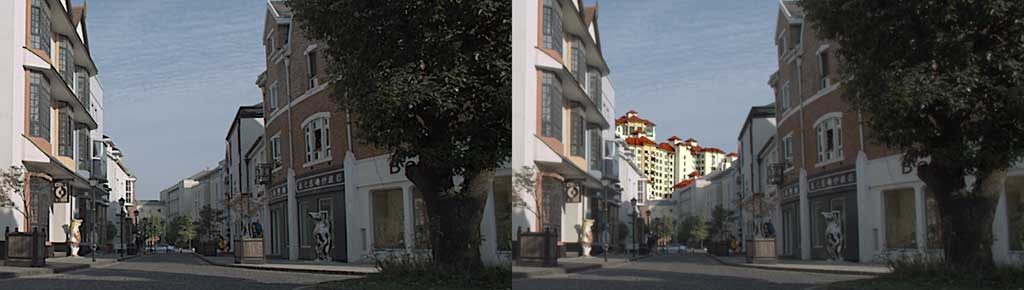
In this guide, we will look into integrating an element with live-action footage. This is a simple matte painting element, but the process is a good starting point to familiarise yourself with the concept of white and black point, which can be applied to basic CG integration as well
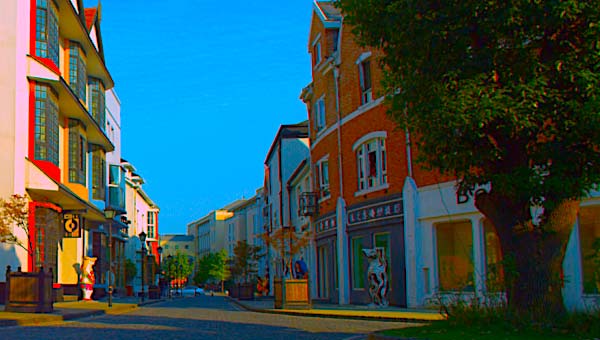
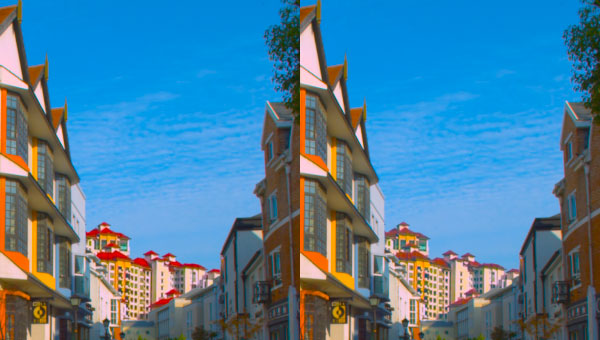
On the right side, the distant buildings are positioned fine but the colors don’t match, we want a better integration
Analysing the Footage
In our aim for integrating the matte painting element with the background, we need to analyze and understand the colors of the background footage, and then adjust our element’s colors to match
The first thing to look into is the white and black point values
The white point is the brightest point in our image – the black point the darkest
We can’t judge these with our naked eye, we need assistant of the color picker and Nuke’s viewer exposure and gamma sliders

Analyzing with Color Picker
Hovering over an area, Nuke shows the color picker values under the viewer
To sample one point crtl-click, an area shift-crtl-drag, clear the selection ctrl-shift-click
White is 1, black 0 in Nuke’s linear color space
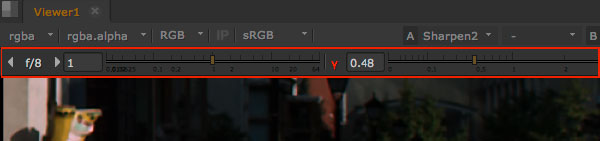
Exposure and Gamma Sliders
exposure on left, gamma on right
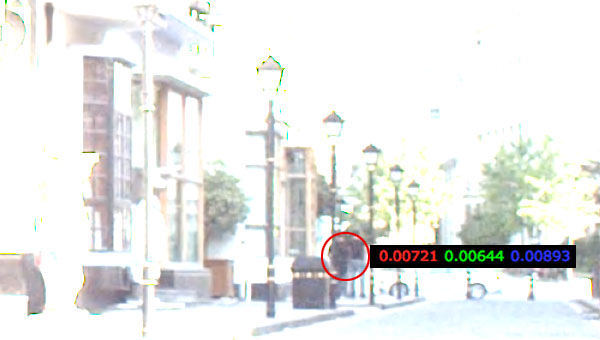
Viewer Gamma Down
Pushing Nuke’s viewer gamma down reveals a clearer look at the highlights
Although the brightest point looked full white, even burned-out with the naked eye, it is really only around 0.7 and it is warm
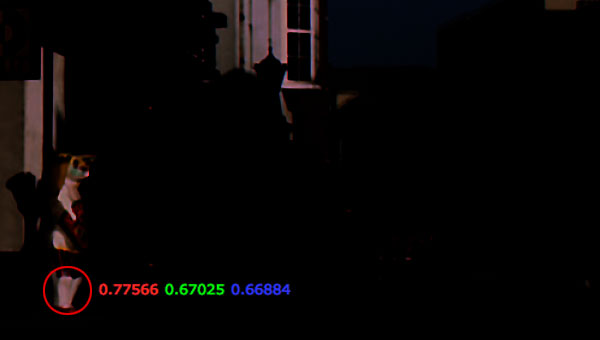
Viewer Exposure Up
Pushing Nuke’s viewer exposure up reveals a clearer look at the shadows
The darkest point is below 0.01, sounds very low but we are in linear color space
Blue is the highest of the three values
Saturation Up
Adding a saturation node and pushing the value up reveals that the shadows are bluish
With these simple steps, we’ve learned: How bright is the brightest point and how dark is the darkest point exactly. And which color tone do they have
We now know our footage’s white and black point
Adjusting White and Black Point
The first step of integrating the matte painting is to match the element’s white and black point to the background
We have plenty of color correction tools to adjust white and black point
Nuke’s Grade node offers seven sliders – six of them adjust the white or black point

whitepoint, gain, multiply do all the same thing – changing the white point
blackpoint and lift change the black point
offset changes both, white and black point simultaneously
exposure is another tool to change the white point
And of course the curves in the ColorLookup node
(More on the page: White and Black Point Controls)

Before Correction
This is the matte painting element before white and black point correction

Comparing White Points
Gamma down shows the matte painting’s whites are way too high and too yellow

Grade Node
Tick the 4 to unfold channels
I’m using multiply. Gain and whitepoint do the same thing

Adjusting White Point
Adjust the individual RGB multiply values to match your source footage
Toggle viewer’s gamma on and off with the Y left of slider

Comparing Black Points
Exposure up shows the matte painting’s blacks go as low as zero, the source’s are around 0.2
For the source footage, find a reference point at a similar distance to the camera
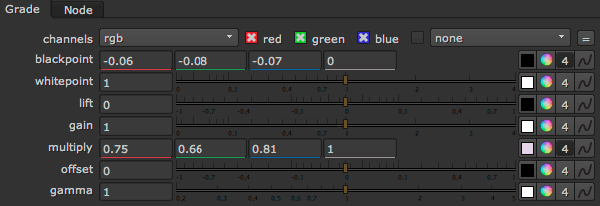
Grade Node Blackpoint
Tick the 4 to unfold channels
I’m using blackpoint. Lift would work, too

Adjusting Black Point
Adjust the individual RGB blackpoint values in small steps
I’m assuming the element is further away than my reference point, so I increased all 3 values above the source footage
Toggle viewer’s exposure on and off with the f left of slider

Result of Correction
With only two adjustments, it’s a massive step forward
There’s always room for improvement, the red rooftops pop out too much and we could tweak the shadows to be a tat cooler
Shadows – Midtones – Highlights
The ColorCorrection node allows to adjust shadows, mid-tones or highlights individually
In this example, I want to adjust the roof and the shadows. Several ways to approach this, to simplify we will include the roof in the shadow correction by using the ColorCorrection node’s ranges
Adjusting any of the shadows-midtones-highlights without checking and setting the ranges is pretty useless
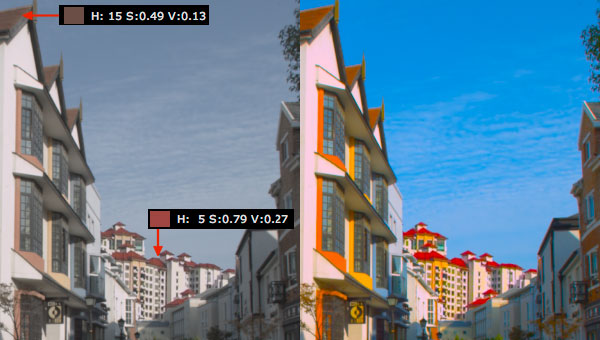
Comparing HSV Values
Saturation-up test on the right shows rooftops really pop
Saturation of source roof is ~0.5 and of element roof at ~0.8
gamma affects everything between black and white but has more effect on darker values, ideal to correct the shadows

Shadow Correction
Adding green and blue to remove the warm tone of the shadows
Gamma and saturation influence each other dramatically, doing both at the same time is tricky, better to do the saturation last

CC Ranges Default
Yellow line is the roof value, it’s not included in the shadow range, but only in the midtone range
Adjusting the shadow values would not affect the roof
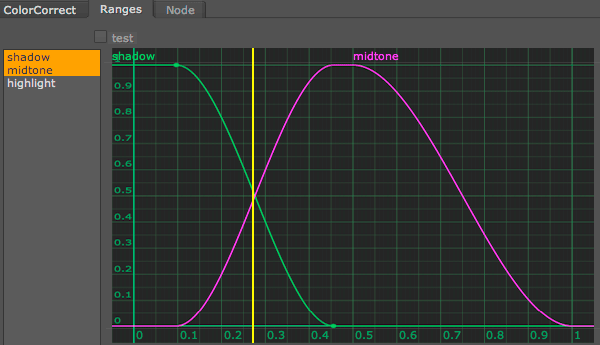
CC Ranges Adjusted
Shadow ranges adjusted to include the roof value, at least partly
Adjusting the ranges to include the values intended to be corrected is crucial to make the correction useful

Result of Correction
Result of the shadow correction on the right side
The rooftops are better now
The bluish shadow is subtle, a bit more noticeable in the saturation-up test